
A Bumroll, which, as its name suggests, was a roll tied around the bum, was an essential piece of Tudor and Elizabethan underwear. In Elizabethan times, it was more commonly called a "roll"; "bumroll" is the modern term for the item.
In the 1560s and 1570s, there are references to small rolls of fabric being sewn into the pleats of a gown to give the skirt more fullness at the waist. Further fullness was achieved by stiffening the skirt fabric with a layer of heavy wool and/or glue-stiffened canvas before pleating it, and stuffing the tops of the pleats with batting.
The first hard evidence of a separate roll worn around the hips are a reference to them in Elizabeth's wardrobe accounts from 1580. It was tied around the hips to make a woman's skirt swell out becomingly at the waistline before falling to the ground. Like all items of women's fashion, it was the victim of scathing satire and clerical condemnation, but it was nevertheless used throughout the 16th century and into the 17th, and considered an essential aid to fashionable dress. Here is a 1590's satirical cartoon featuring a good look at the late period bumroll.
It was used in conjunction with the Farthingale, or hoopskirt, worn by richer folk, as well as being worn without a farthingale by poorer women who wished to make an attempt at looking fashionable.
A detailed discussion on the evolution of the bumroll can be found in Sarah Goodman's article on :Spanish Farthingales and Bumrolls

| Other Elizabethan Underpinnings: |

To make a bumroll, you need:
A bumroll pattern is very easy to make. You'll need:
First, measure around your hips a couple of inches below your waist. Subtract four inches off of this. This will be the inner circumference of your bumroll.

Lay the tape measure in an oval shape on the paper, and trace around it (smoothing all wiggles and lumps, of course) so that you have a partially open oval which is the above measurement--hips minus 4 inches. (See diagram to your right.) Gudrun Thomassen gave the following suggestion to create a good representation of your waist shape for the inside curve of this bumroll:
Note:
Depending on your height and physique, not to mention the decade of the
16th century your dress is designed for, the above bumroll may be too big
for you. I myself am 5'11" and of a "busty" nature; for me, the pattern
works well. Others, however, have said that their hips resemble a
continental shelf. Use your own judgement when measuring the width of the
bumroll pattern.
Once you have a nice smooth pattern, cut it out and lay it on two layers of fabric. Pin it or trace around it, and cut around the pattern edge, leaving 1/2 an inch or seam allowance between where you cut and the edge of the pattern.

Now take the two pieces of your bumroll and lay them right sides together. Cut your yard of ribbon in half, and place each half between the two layers, with the ends of the ribbon matching the edge of the fabric, and the body of the ribbon between
the two pieces of fabric. (See diagram to your left.) Beginning near the middle inside of the bumroll, sew 1/2 an inch away from the edge all the way around. sew the ribbon and the two pieces of fabric together at the points, but make sure that the rib
bon doesn't get caught anywhere else. When you come back to where you started sewing, leave a 4-6 inch space unsewn. This is necessary for turning the bumroll inside out.

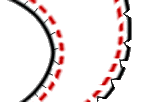
Once the bumroll pieces are sewn together, clip the seam allowance. Make simple clips along the inside, but clip little notches along the outside edge. (See diagram to your right.) This helps the seams to lay flat without wrinkling or puckering.
Now turn the bumroll inside out, pulling on the ribbons to get the points completely turned. Stuff it with batting. Stuff it quite firmly, so that the bumroll is solid to the touch; remember, it's going to be holding up the weight of heavy skirts. If y our skirt is to be made out of velvet, upholstery fabric or other very heavy fabric, it is particularly important to make sure that the bumroll is solidly stuffed.
Using a needle and thread, sew the opening through which you stuffed the bumroll closed. You can knot the ends of your ribbon, wrap them in scotch tape, dip them in wax, or even put metal points on them. And there's your bumroll!
